Email: graham@gardeningwithgraham.com
Terms and conditions
Follow on Instagram: gardening_with_graham_and_pam
© Gardeningwithgraham.com 2023


Spades
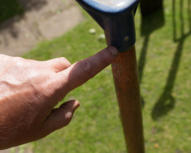
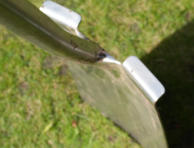
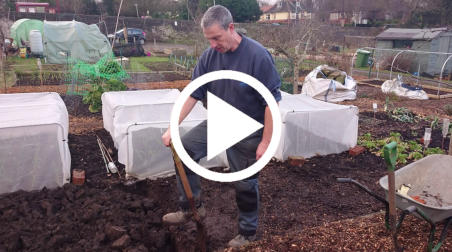
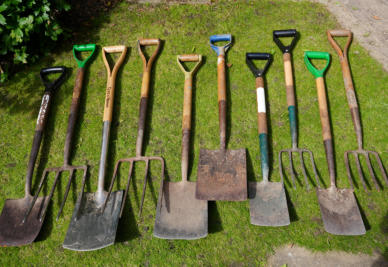
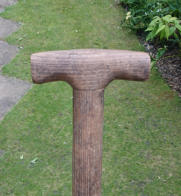
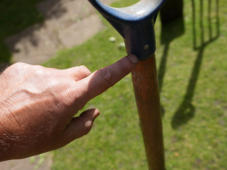
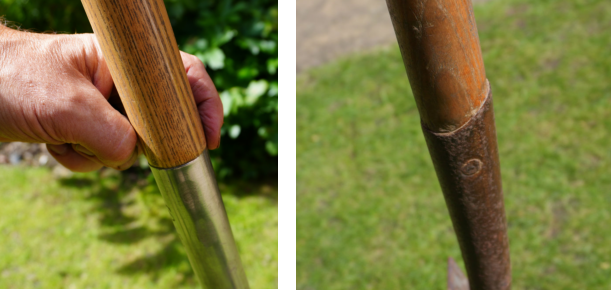
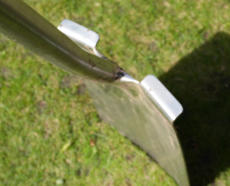
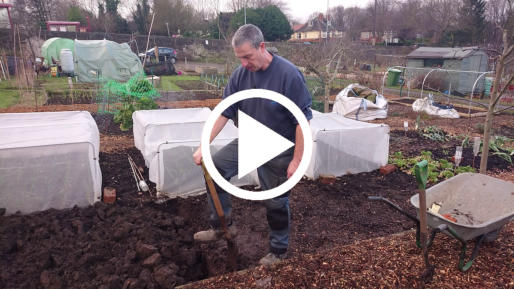
There are various types of spades, the spades that I am referring to here are known as digging spades. Here is a picture of the various digging spades (and forks) that we have. So lets take a look at a typical digging spade. They all have a metal blade (often referred to as the spit), a shaft (usually made of wood) and a handle. As you can probably see in the picture, these all have D shaped handles, some made of plastic, while others are made of wood. There is also another option, that being the traditional T shaped handle as shown to the left. Which handle you choose is largely down to personal comfort. In the picture there are two spades on the right that have smaller blades, that is because these are border spades. I have included these in this section because if you are someone who is perhaps a little weaker then these would make an ideal starter spade giving you a smaller section of soil to lift when digging (These are the spades my wife uses to dig with). They are generally the same style as a digging spade. The spade on the left has a shorter blade, this is through use (the metal has worn down), I have had this spade for about thirty years and used it as my main spade for the majority of that time. Most of the spades I have have steel blades but I do have one that has a stainless steel blade, I will explain more about this later. The spade shaft should be angled away from your body when the blade is placed upright to the soil, as shown in the picture, with the handle at a comfortable angle for your arm when stood upright, this helps with the digging process and reduces the strain on your back. Choosing a good spade can be difficult, there are some things that you cannot gauge just by looking at the spade, such as the strength of the shaft or the blade. I have broken many spades when digging usually in heavy clay. Generally it is the shaft that breaks where it joins the blade but I have had one that broke across the blade itself. The better spades may seem expensive but having the correct spade from that start can save you a lot of money in the long run. What should you be looking for when you choose your spade then. Starting at the handle. Check that the handle itself is smooth, with no scratches, splinters or damage and that it feels comfortable in your hand. If the handle is a plastic one, try to see if the plastic looks strong enough and that there are no signs of cracks (I have had a few plastic handles split next to the rivet). Follow down the shaft with your bare hand feeling for any roughness or sharp edges. The shaft should be smooth along its full length, this includes the joint where the shaft is inserted into the metal part, where the rivet secures the wooden shaft in place and where the metal wraps around, there should be no gap that will rub your hand. Here are two examples, the one on the left is an example of what to look for, with a good smooth joint and no lip to cause blisters. The one on the right, I would definitely avoid, although the rivet has been smoothed off nicely, where wood is inserted, the metal part of the shaft is very prominent and I would expect to get blisters every time I use this spade for digging. Then we get to the blade itself. There are steel and stainless steel blades. Stainless steel always looks cleaner and is less likely to rust (good for those who don’t want to clean their spade) but on the other hand it never sharpens as much as a steel. Using a steel blade is usually easier (though very marginally) I do notice this when doing lots of digging and for that reason I would choose steel over stainless steel personally. The final thing to look at and consider is the top of the blade, some spades have a flattened top to their blade. This is something I would choose only if digging in trainers or soft shoes (which you should not do), but would otherwise avoid. There are two reasons I would avoid this type of blade. I bought a spade with these flattened tops, that I thought looked ideal to replace my old worn spade. Since I have found that when I am digging to the full spit depth, the lip catches on the surface of the soil behind the spade as I lift and turn the soil making digging a little harder. The second reason I would avoid it is because I often use a spade to scrape soil level. When doing so I put the blade level with the soil. This is impossible with the lip and even the slight angle that I am forced to use causes the spade to dig in rather than scrape along the surface. Digging with a spade Now that you have read about choosing your spade, lets take a look at how to dig with it. I would highly recommend that you wear sturdy shoes or boots when digging (ideally safety boots). Using footwear that is not suitable for digging can permanently damage the sole of your foot. I am right handed so I will describe the digging process for someone who is right handed. If you are left handed, when I say use your right hand, you use your left hand and likewise if I say use your left hand, you use your right hand. First off we chop the sides of the sod of soil we are going to dig out, at roughly the width of your spade. By chop, what I mean is to lift the spade and slam the blade down into the soil (do not expect this to go in very deep). This should be done to both sides where you are to dig out your first sod of soil. What this does is encourage the soil to break at the sides of your spade blade when you lift the sod. Holding the spade with your right hand put the blade of the spade at 90 degrees to the soil in an upright position with your arm stretched out in front of you at a comfortable angle, as in the image shown above. Then using the heel of your foot (or if wearing safety boots you can use the arch of your foot) push down on the spade. If the spade does not push in easily, rock it side to side (you can use both hands for this) while pushing down with your foot. When the blade is pushed fully down into the soil pull back with your arm, or use both arms if preferred. This will break the sod of soil away. Then bending forward continue pushing the handle down towards the soil using your right hand and bring your other hand down to grab the metal part of the spade shaft as close to the blade as is comfortable. Locking your right arm, lift the spade (with the soil on the blade) using your left arm. Twist both hands to turn the spade and with it the sod of soil that you have dug out, dropping the soil, upside down, off the spade slightly forward of the hole it came from. Then repeat this process, working sideways. I have also made this short video so that you can see how to dig. Click on the image to watch it.. There are many reasons that the spade may not just push down when you are trying to dig, such as very heavy clay, stones or roots. If the spade will not go in fully by rocking it, do not jump up and down on the spade. Instead dig to the depth that you can. In the case of buried objects such as large stones you may be able to dig them out. It is not necessary to remove small stones from the soil, in fact they are better left as they will help with drainage. Digging correctly will reduce the strain on your back but it will not stop you from getting back ache. Your back will ache because you are using your muscles in a way that you would not normally use them. If you are new to digging, it is worth doing a small amount and then having a break, if necessary taking several days to dig the area over. This will give your back a rest, help build your muscles gradually and reduce the chance of getting back ache. As with any form of exercise, drink plenty of fluids and keep yourself hydrated. Something that I find helps me after a hard days digging is a nice long soak in a hot bath to relax the muscles.When you purchase through links on our site, we may earn an affiliate commission. Learn more


Email: graham@gardeningwithgraham.com
Terms and conditions
Follow on Instagram: gardening_with_graham_and_pam
© Graham Clark 2022


Spades
There are various types of spades, the spades that I am referring to here are known as digging spades. Here is a picture of the various digging spades (and forks) that we have. So lets take a look at a typical digging spade. They all have a metal blade (often referred to as the spit), a shaft (usually made of wood) and a handle. As you can probably see in the picture, these all have D shaped handles, some made of plastic, while others are made of wood. There is also another option, that being the traditional T shaped handle as shown to the left. Which handle you choose is largely down to personal comfort. In the picture there are two spades on the right that have smaller blades, that is because these are border spades. I have included these in this section because if you are someone who is perhaps a little weaker then these would make an ideal starter spade giving you a smaller section of soil to lift when digging (These are the spades my wife uses to dig with). They are generally the same style as a digging spade. The spade on the left has a shorter blade, this is through use (the metal has worn down), I have had this spade for about thirty years and used it as my main spade for the majority of that time. Most of the spades I have have steel blades but I do have one that has a stainless steel blade, I will explain more about this later. The spade shaft should be angled away from your body when the blade is placed upright to the soil, as shown in the picture, with the handle at a comfortable angle for your arm when stood upright, this helps with the digging process and reduces the strain on your back. Choosing a good spade can be difficult, there are some things that you cannot gauge just by looking at the spade, such as the strength of the shaft or the blade. I have broken many spades when digging usually in heavy clay. Generally it is the shaft that breaks where it joins the blade but I have had one that broke across the blade itself. The better spades may seem expensive but having the correct spade from that start can save you a lot of money in the long run. What should you be looking for when you choose your spade then. Starting at the handle. Check that the handle itself is smooth, with no scratches, splinters or damage and that it feels comfortable in your hand. If the handle is a plastic one, try to see if the plastic looks strong enough and that there are no signs of cracks (I have had a few plastic handles split next to the rivet). Follow down the shaft with your bare hand feeling for any roughness or sharp edges. The shaft should be smooth along its full length, this includes the joint where the shaft is inserted into the metal part, where the rivet secures the wooden shaft in place and where the metal wraps around, there should be no gap that will rub your hand. Here are two examples, the one on the left is an example of what to look for, with a good smooth joint and no lip to cause blisters. The one on the right, I would definitely avoid, although the rivet has been smoothed off nicely, where wood is inserted, the metal part of the shaft is very prominent and I would expect to get blisters every time I use this spade for digging. Then we get to the blade itself. There are steel and stainless steel blades. Stainless steel always looks cleaner and is less likely to rust (good for those who don’t want to clean their spade) but on the other hand it never sharpens as much as a steel. Using a steel blade is usually easier (though very marginally) I do notice this when doing lots of digging and for that reason I would choose steel over stainless steel personally. The final thing to look at and consider is the top of the blade, some spades have a flattened top to their blade. This is something I would choose only if digging in trainers or soft shoes (which you should not do), but would otherwise avoid. There are two reasons I would avoid this type of blade. I bought a spade with these flattened tops, that I thought looked ideal to replace my old worn spade. Since I have found that when I am digging to the full spit depth, the lip catches on the surface of the soil behind the spade as I lift and turn the soil making digging a little harder. The second reason I would avoid it is because I often use a spade to scrape soil level. When doing so I put the blade level with the soil. This is impossible with the lip and even the slight angle that I am forced to use causes the spade to dig in rather than scrape along the surface. Digging with a spade Now that you have read about choosing your spade, lets take a look at how to dig with it. I would highly recommend that you wear sturdy shoes or boots when digging (ideally safety boots). Using footwear that is not suitable for digging can permanently damage the sole of your foot. I am right handed so I will describe the digging process for someone who is right handed. If you are left handed, when I say use your right hand, you use your left hand and likewise if I say use your left hand, you use your right hand. First off we chop the sides of the sod of soil we are going to dig out, at roughly the width of your spade. By chop, what I mean is to lift the spade and slam the blade down into the soil (do not expect this to go in very deep). This should be done to both sides where you are to dig out your first sod of soil. What this does is encourage the soil to break at the sides of your spade blade when you lift the sod. Holding the spade with your right hand put the blade of the spade at 90 degrees to the soil in an upright position with your arm stretched out in front of you at a comfortable angle, as in the image shown above. Then using the heel of your foot (or if wearing safety boots you can use the arch of your foot) push down on the spade. If the spade does not push in easily, rock it side to side (you can use both hands for this) while pushing down with your foot. When the blade is pushed fully down into the soil pull back with your arm, or use both arms if preferred. This will break the sod of soil away. Then bending forward continue pushing the handle down towards the soil using your right hand and bring your other hand down to grab the metal part of the spade shaft as close to the blade as is comfortable. Locking your right arm, lift the spade (with the soil on the blade) using your left arm. Twist both hands to turn the spade and with it the sod of soil that you have dug out, dropping the soil, upside down, off the spade slightly forward of the hole it came from. Then repeat this process, working sideways. I have also made this short video so that you can see how to dig. Click on the image to watch it.. There are many reasons that the spade may not just push down when you are trying to dig, such as very heavy clay, stones or roots. If the spade will not go in fully by rocking it, do not jump up and down on the spade. Instead dig to the depth that you can. In the case of buried objects such as large stones you may be able to dig them out. It is not necessary to remove small stones from the soil, in fact they are better left as they will help with drainage. Digging correctly will reduce the strain on your back but it will not stop you from getting back ache. Your back will ache because you are using your muscles in a way that you would not normally use them. If you are new to digging, it is worth doing a small amount and then having a break, if necessary taking several days to dig the area over. This will give your back a rest, help build your muscles gradually and reduce the chance of getting back ache. As with any form of exercise, drink plenty of fluids and keep yourself hydrated. Something that I find helps me after a hard days digging is a nice long soak in a hot bath to relax the muscles.
When you purchase through links on our site, we may earn an affiliate commission. Learn more